Setting up Prebid Video in Google Ad Manager
This page describes how to set up video creatives in Google Ad Manager for use with Prebid.js.
For general Google Ad Manager line item setup instructions, see the other pages in this section.
For engineering setup instructions, see Show Video Ads with a Google Ad Manager Video Tag.
Line Item Setup
- In the New line item dialog, choose "Video".
- Select the appropriate Line Item Type, etc.
- In the Expected creatives section, choose your video size, e.g., 640x480v.
- Set the dates, rate, limit, and targeting as desired. For example, for SendAllBids include targeting for "hb_bidder_rubicon=rubicon" as well as the hb_pb_rubicon targeting. This isn't needed if only creating one set of orders for all bidders.
- Remember to set the hb_pb=BUCKET targeting for each line item, or hb_pb_BIDDER=BUCKET if using separate line items for each bidder.
- Save the line item.
Be sure to duplicate your line item and video creative for each Prebid price bucket you intend to create.
By default, Prebid.js caps all CPMs at $20. As a video seller, you may expect to see CPMs higher than $20. In order to receive those bids, you’ll need to make sure your dev team implements custom price buckets as described in the engineering setup instructions. Once those changes are made on the engineering side, there should be no changes required from the ad ops side to support CPMs over $20.
Creative Setup
When setting up video creatives, it’s important to understand where the VAST XML is stored for each of your bidders. The most common place to store VAST XML is AppNexus’ cache, but some bidders (such as RubiconProject and SpotX) use their own cache services. To support such bidders, see the Multiple Cache Locations instructions below.
Single Cache Location
If you only use bidders that provide full VAST responses, do the following:
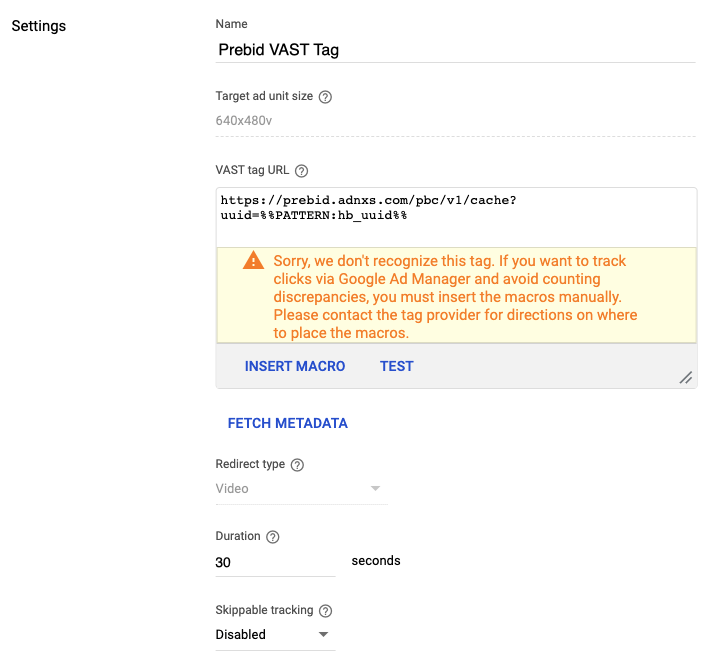
1. For each line item you create, click on the Creatives tab, click the ADD CREATIVE button, and choose the size you're entering.
2. In the dialog that appears, choose Redirect.
3. Set the VAST tag URL to the cache location.
If you’re using a single order for all bidders, then the VAST URL will be the same for each bidder:
   https://prebid.adnxs.com/pbc/v1/cache?uuid=%%PATTERN:hb_uuid%%
or
   [other bidder cache location]
If you’re using different orders for each bidder, the VAST URL for each will include the bidder-specific targeting variable:
   https://prebid.adnxs.com/pbc/v1/cache?uuid=%%PATTERN:hb_uuid_BIDDERCODE%%
or
   [other bidder cache location]
This VAST tag URL is required in order to show video ads. It points to a server-side cache hosted by your Prebid Server provider.
Prebid Cache and the VAST creative URL warning
Google Ad Manager will show you a warning stating that fetching VAST from the creative
URL failed. This is expected, since the creative URL above points
to a server-side asset cache hosted by Prebid Server.
4. Set the Duration to the max length of video ads you serve. If you don't know what the max length is, set it to 30.
In the past Prebid used to recommend setting duration to 0 or 1, but GAM now requires that this field reflect the actual video ad length. Since ads flowing through header bidding are going to differ in length, choose a value that matches a common ad length like 15 or 30.
The resulting creative should look something like the following:

Multiple Cache Locations
If you're utilizing any bidders that cache their own VAST, you have two options:- If you're using Prebid.js 4.28 or later, you can specify the ignoreBidderCacheKey option on setConfig({cache}). This will cause the browser to generate a VAST wrapper and cache it in your standard location. Then you can use the instructions above for "Single Cache Location". The tradeoff is that this approach requires the video player to unwrap one extra level of VAST.
- Utilize creative-level targeting in the ad server. Keep reading for more details.
1. In the line item's Expected creatives box, choose Creative Targeting and "Add New Targeting".
2. Give the targeting set a name like "Prebid Default Video Cache URL" and set Custom Targeting as appropriate, e.g., "hb_bidder is none of rubicon, spotx". Save the targeting.
3. For each bidder that uses their own cache, click ADD SIZE in the "Expected creatives" section. Again, choose Creative Targeting and "Add New Targeting".
4. Give the targeting a name like "Prebid Rubicon Video Cache URL". Set Custom Targeting appropriately, e.g., "hb_bidder is any of rubicon". Save the targeting.
5. Save the line item.
Now that the targeting is defined, we're going to add the creatives.
6. Go to the line item's Creatives tab.
7. Make one creative for each of the targets. There are a couple of ways to do this on the GAM UI, but each approach will result in a creative entry screen similar to the screenshot above for the "Single Cache Location" process. Enter a name (e.g. "AppNexus VAST tag") and the VAST URL as described above.
8. The end result should look something like this:

That’s it as far as Prebid setup is concerned. At this point you can add any other options you would normally use, such as labels or tracking URLs.
Further Reading
- Show Video Ads with Google Ad Manager (Engineering setup)
- Create a Master Video Tag Manually (Google Ad Manager)
- Add Key-Values to a Master Video Ad Tag (Google Ad Manager)
- Google Ad Manager Macros (Google Ad Manager)